
DIY Pull out Trash Cabinet
I’m so excited to show you how I turned a regular cabinet into a DIY pull out trash cabinet.

I have never had a place for my trash can in my kitchen. We’ve just set it by the side of the cabinet for 7 years, and it always drove me nuts! Since I had a cabinet that I wasn’t really using for anything other than junk, I decided to turn my regular cabinet into a DIY pull out trash drawer.

And I’m excited to share the step by step process with you, so you can turn a regular cabinet into a DIY pull out trash cabinet too!
How to turn a regular cabinet into a DIY Pull out Trash Cabinet
Supplies:
Drawer Slides
Melamine Shelf
1×4 lumber (see step 4)
Trash Can that fits in your cabinet
1 1/4″ pocket hole screws
1″ grabber screws
Tools:
Impact Driver/ Drill
Jig Saw
Kreg Jig (optional)
Drawer Slide Jig (optional)
Instructions:
Step 1: Remove Hinges
Start by removing the hinges and taking the door off your cabinet. You’ll want to take the hinges completely off the cabinet door.

Step 2: Prepare a “Shelf”
You’ll need a “shelf” to inset your trash can into- it is ideal if if is made of a wipeable material, like 3/4″ melamine.
You will want this to be the measurement of the inside of your cabinet minus 1/4″. So if your cabinet is 24″ deep by 15″ wide, you will cut your shelf 23 3/4″ x 14 3/4″. This will give you 1/8″ clearance on each side for the shelf to slide in and out.
Our cabinet already had a shelf in it, so we simply removed this shelf and used it.
Step 3: Trace Trash Can
Set your trash can upside down on your shelf piece. Trace around the edge of the trash can.

Then trace another line about 1/2″ INSIDE the line you just traced. You will cut the INSIDE line, so your trash can will sit in this hole that you cut out.

Step 4: Cut out a hole for the trash can
Use a jigsaw and cut on the inside line that you just drew. This should leave enough space for the lip of your trash can to sit right inside of the hole.

Step 5: Build the drawer box.
Use 1×4’s to build a drawer box. We had some scrap 3/4″ plywood, so we simply ripped this into 4 inch stips, and that worked too.
You’ll want your box to fit the length of your shelf, but to be 1″ short of the width of the shelf. For instance, if your cabinet is 24″ deep by 15″ wide, your shelf would be 23 3/4″ x 14 3/4″. Then you would want your drawer box to be 23 3/4″ x 13 3/4″. This is to allow 1/2″ on each side of the drawer box for the drawer slides. I used grabber screws to build the drawer box.
I used these Liberty Hardware soft close Drawer Slides (from the Home Depot or Amazon), and leaving 1/2″ clearance on EACH side (1″ total) was perfect. If you are using different drawer slides, you’ll want to take that measurement into account.
(Don’t mind my that my photos are out of order- I did this part before I cut my hole. Either way will work.)

Step 6: Attach Drawer Box to the Shelf
Using a Kreg Jig and 1 1/4″ pocket hole screws, attach the drawer box to the shelf. Make sure your ends are flush and you are even on the sides.

Step 7: Install Drawer Slides
Once your drawer box is built and attached to your shelf, it’s time to install the drawer slides. As I mentioned above, I used these Liberty Hardware soft close Drawer Slides (from the Home Depot or Amazon). I chose these slides because they are super sturdy and I wanted them to hold up when they are holding an entire trash can that can get pretty heavy when it’s full of trash.
I chose the 22″ drawer slides, because my cabinet is 24″ deep. The general rule of thumb is to go down 2 inches from the depth of your cabinet.
We knew where to put our drawer slides because we sent our trash can into the drawer box and then held it up, so there was about an inch between the bottom of the trash can and the bottom of the cabinet, then we installed the drawer slides to the cabinet.

Step 8: Attach Drawer Slides to the Drawer Box
Here’s a little secret about me. There are two things I hate building- drawers and chairs. Honestly, drawer slides intimidate me because if you don’t get things straight and square and lined up perfectly, you can run into a bunch of problems. But I used the Kreg Drawer Slide Jig for this installation, and it really helped! I didn’t have any problems, and it worked like a charm.
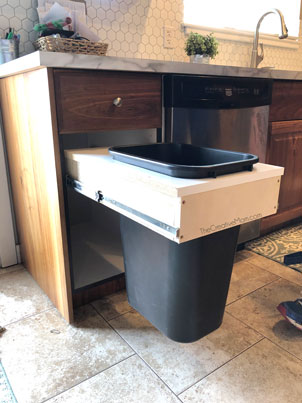
Do you see how the top “shelf” of our drawer box overhangs the rest of the box? We did this so that dust and trash wouldn’t fall down into the drawer slides or way back into the back of the cabinet. This is also why I wanted to use a wipeable melamine for the “shelf”, because then I could wipe down any splatters or spills that missed the trash can. And with 4 kids, I’m sure that will happen!

Step 9: Check for fit
Insert your trash can drawer into your cabinet and check for fit.
Step 10: Attach Cabinet Door (drawer front)
Once we made sure everything fit correctly in the cabinet, we attached the cabinet door to the front of the drawer box, using 1″ grabber screws. We drilled a pilot hole first (from the inside), and then attached the grabber screws. Make sure to check that your screws don’t go all the way through your cabinet door.

Step 11: Attach your drawer pull
Drill a hole and install your drawer pull. You can see where our door pull used to be, on the right side of our cabinet. We want it to be in the center now, so that the drawer gets pulled out straight. We will do our best to fill and fix the original hole later.

Step 12: Finish
Enjoy your new DIY Pull Out Trash Cabinet. We have loved having ours hidden away out of sight.

I would love if you would share this project, or save it to your Pinterest board for later! You can hover your mouse over the image ABOVE and click the “save” button, or share this on Instagram, Facebook, or Twitter.
If you liked this project, you might like some of my other DIY projects:
How to frame a bathroom mirror

Farmhouse Storage Coffee Table


Industrial Farmhouse Console Table


Farmhouse Buffet free building plans

How to install Board & Batten the easy way

Build a farmhouse bench for under $20

DIY Pallet Art (without using a pallet)

Thanks for the great idea and tutorial. I had to buy two matching trash cans and a $6 piece of melamine laminate, but the rest of my drawer was built with scraps from other projects. It looks amazing and works even better!