
Industrial Farmhouse Console Table (free building plans)
I built this industrial farmhouse console table to go in my entryway, and I loved how it turned out! It turned out so great and I am so excited to share the free building plans with you!!

I designed and built this industrial farmhouse console table to sit in my entryway, so it’s long and skinny. It sits just tall enough to be used as a standing table, which in my case means housing cute seasonal decorations and in my husband’s case means housing all of his amazon purchases. Haha!!!

I used basic, builder grade lumber, so the whole build cost about $100 and was really simple to build. I built this whole farmhouse console table 100% by myself- except my husband cut that metal for me. It took me 2 afternoons, because I still had to do all of my mom stuff, but it went super fast and was super simple.

Doesn’t this table look so cute up against my quick & easy board and batten? And that DIY shiplap wreath display frame really adds to the charm of this piece.
I added some simple metal accents to the farmhouse console table, which I think really added to the style of the piece. It has a cute, industrial vibe, without being cold and harsh.

I absolutely love the way this piece turned out, it is exactly what I envisioned for this space.

I posted all of my building plans over at BuildSomething.com.


So head over and print out those building plans, and I’m going to show you the step-by-step process of how to build this industrial farmhouse console table.
HOW TO BUILD AN INDUSTRIAL FARMHOUSE CONSOLE TABLE
1. Cut lumber
See the plans at BuildSomething.com for the cut list.
2. Build the end panels
Use the Kreg Jig to drill pocket holes, and attach the cross braces to the legs with pocket hole screws. The bottom piece will be 5 inches off the ground.

3. Attach the stretchers
Cut the 2×4 stretchers according to the plans. Use the Kreg Jig to attach the stretchers to the legs.

4. Paint Frame
Once your frame is completely built, you’ll want to paint it before adding the metal accents, the table top, and the shelf top.
I used Kilz Chalk Paint in the color white, which I was really happy with. It covered so well and was thick and nice to work with. Oh, and it dried in a jiffy, which was amazing for an impatient person like me. This is not the cheapest paint you will find, but it is really high quality and I loved using it on this project- you can find it on my Amazon favorites page.
And I sprayed the chalk style paint on with my Home Right Finish Max Extra Paint Sprayer. I absolutely LOOOVE this paint sprayer, and for about $100, you can’t go wrong with investing in a good sprayer.

5. Prepare Steel Accents
I got this flat steel bar from Amazon, and I love the cool look it added to my table. You’ll want to cut your steel to the size indicated on the plans.

Pre drill a hole in each end of your steel bar.

Paint your steel if you’d like. I painted my steel because it was really dirty and I didn’t want it to rub off on anything (or anyone), and I like the look of a nice black piece of steel. I used this cool hammered metal spray paint in flat black to paint my metal.
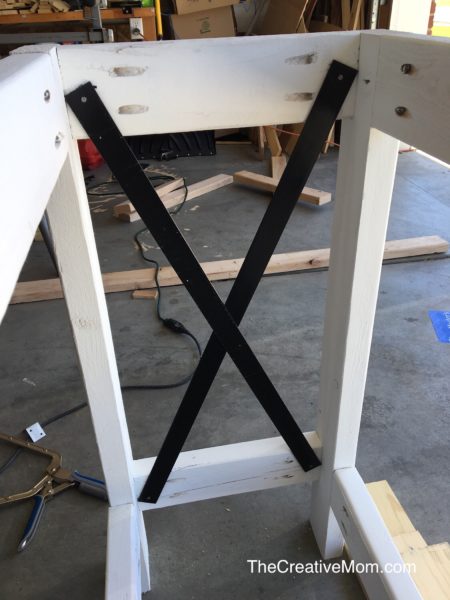
6. Attach Metal Accents
Use short grabber screws to attach your metal accents. I measured down from the top of my top 2×4 about 2 inches, then drew a line. Since your metal accent pieces are the same size and length, if you attach them at the same spot on the top board, then you should be able to set the bottom edge right up against the 2×4 legs, and your x’s will be even. Hope that makes sense!
7. Attach shelf supports
Grab some scrap pieces of 2×4’s or 2×2’s, and pre-paint them. Screw them over the top of your metal accent pieces. This will provide support for your shelf top.

8. Attach L-brackets to the frame.
Attach 4 L-brackets to your table frame. This will be used to fasten the table top to the table frame.

9. Prepare Tabletop and shelf top
On table tops like this, I usually glue up 1×4’s or 1×6’s like I did on my coffee table. My friend told me about these cool project panels you can find at Lowe’s and Home Depot. The project panels cost about the same amount as the lumber to glue up for the table top- but they are already glued, sanded, and ready to go. These are such a game changer in the way I build my furniture.


I grabbed a couple of these and had the Lowe’s guy rip them and cut them to size. So when I took them home, all I had to do was give it a quick sanding (with a 200 grit sandpaper to really smooth things out) and finish them with my favorite stain (minwax special walnut) and polyurethane- you can find these on my Amazon Favorites Page.
10. Attach the tabletop and shelf top
The table top should overhang 1 inch on each side and 1 inch on the front of your table. There shouldn’t be an overhang on the back, as the table is designed to sit flush against the wall. Use a pen or marker to mark on the underside of the table where the L-brackets match up with the table top and drill some pilot holes so that when you screw your table top down, it won’t split.
11. All finished!
Industrial Farmhouse Console Table Build Details:
Time Spent: About 4-5 hours
Cost: About $100
Paint Color: Kilz Chalky Style Paint in WHITE
Stain Color: Minwax Special Walnut with Minwax wipe on Poly
If you liked this project, you might like some of my other DIY projects:
How to frame a bathroom mirror
Farmhouse Storage Coffee Table


Industrial Farmhouse Console Table


DIY Farmhouse Coffee Table (Ikea Hack)


Farmhouse Buffet free building plans

How to install Board & Batten the easy way

Build a farmhouse bench for under $20

DIY Pallet Art (without using a pallet)

What software/program do you use to design your furniture? I’m trying to find something and running out of luck…although I’m super new, have no idea what I’m doing, but have lots of plans that I think I can undertake. haha. Thank you!