
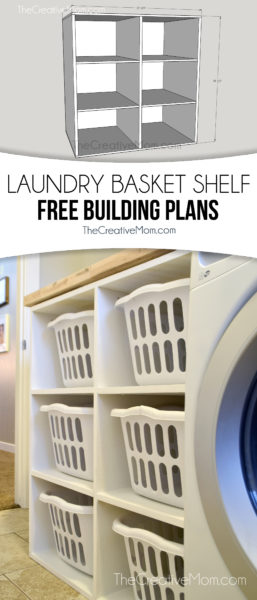
Laundry Sorter Building Plans
This laundry room update makes our laundry room so much more functional and pretty. I’m sharing the free building plans for that laundry sorter!

When we moved into our home, our laundry room was very builder grade and not very functional. We’ve lived with it for a while and I finally decided I needed to take matters into my own hands and build a laundry sorter.

So I teamed up with BuildSomething.com to design building plans and I’m excited to share them with you guys!

I love the way this laundry sorter turned out. it’s the perfect little shelf for our laundry baskets, and I feel like I’ll be able to keep up on organization and sorting a lot better now. Since we have 4 kids, each of them will have their own laundry basket, then I’ll have one for towels, and one for my husband and me.

The whole system is the perfect size that my kids can get to their laundry really easily- I’m not sure that means they’ll help out much, but at least they CAN. Haha!!

I designed the unit to be as tall as a standard washer and dryer, so you can put a countertop across the whole laundry sorter and washer and dryer. We added this pretty butcher block and I’m really happy with the way the whole things looks.

Not only is our laundry room a lot more functional now, but it’s also really pretty, so I’m happy!!!
How to Build a Laundry Sorter
Now onto the building process. I’ll show you the step by step of this build, but all of the measurements and cut diagrams are available to download for free on BuildSomething.com.
Before you start: Download the Free Laundry Sorter Building Plans here:
BuildSomething.com
Step 1: Cut wood and Drill Pocket Holes
We used 3/4″ plywood for this project, with 1/4″ plywood backing. Using the cut diagram on BuildSomething.com, cut your plywood and drill your pocket holes. I used my Kreg Jig, and it made the process super easy!

Step 2: Build Box
Using wood glue and pocket hole screws, attach your vertical pieces to your top and bottom pieces. I love using this corner clamp from Kreg. It is really handy!

Step 3: Add Middle Support
Using wood glue and pocket hole screws, attach your middle vertical support.

Step 4: Attach Shelves
Using wood glue and pocket hole screws, attach your shelves. You’ll want to make sure your pocket holes are on the bottom.

Step 5: Add Backing
Using staples, add the backing to the back of your shelf.
Step 6: Finish
Sand, putty, and paint or stain your piece. I used my paint sprayer and spray shelter to spray my laundry sorter in my garage.

I think this is going to be a great addition to our laundry room. I am really happy with how it turned out!
I would love if you would share this project, or save it to your Pinterest board for later! You can hover your mouse over the image ABOVE and click the “save” button, or share this on Instagram, Facebook, or Twitter.
If you liked this project, you might like some of my other DIY projects:
How to frame a bathroom mirror
Farmhouse Storage Coffee Table


Industrial Farmhouse Console Table


DIY Farmhouse Coffee Table (Ikea Hack)


Farmhouse Buffet free building plans

How to install Board & Batten the easy way

Build a farmhouse bench for under $20

DIY Pallet Art (without using a pallet)

Where did you buy the countertop ?
You have brought to life what was in my head beautifully! I am SO excited about this project. What size is your butcher board and where did you find it? Thank you!
Are you aware is there is a portable workshop similar to the paint booth that could be set up inside a garage?
what is the brand/ size of the laundry baskets?
They are basic laundry baskets you can find pretty much anywhere. This particular brand are 1.5 bushels from Target, and were the cheapest ones I could find. I believe they were about $4 each.
Natalie