
How to Install Board and Batten (the easy way)
Board and Batten can make such a huge statement in a space. It can brighten up a room and add so much character without much effort or money. I’m so excited to show you how to install board and batten the easy way. Seriously, this has taken our entryway from “meh” to “wow”.

Ever since we’ve lived in our home, I knew I wanted to do board and batten in our entryway. I have always loved our entryway, especially with our farmhouse bench and gallery wall, but now I really love it. And the best part is the oohs and ahhs I get when people come to our home.

I can’t even tell you how much brighter and cleaner this space feels now. It’s very inviting, which is super important in an entryway! Everyone who walks into my home immediately compliments my entry.

Don’t you just love how it turned out? One of my favorite parts of installing board and batten is how it made my farmhouse bench really pop! I have always loved this farmhouse bench (especially because it cost less than $20 to build and only took a afternoon!)

And our gallery wall is another HUGE impact project. I used a bunch of stacked frames, like my jumbo picture frame to create this space, and I’m in love with it.

Ok, enough about how much I love my DIY board and batten. Cause it’s pretty obvious I love it, and the way it has changed the entire feel of my home. Let’s get down to business and show you how to install board and batten (the easy way). This post contains affiliate links.
Supplies and Tools:
White Paint
Paint Brush, Roller, Paint Tray
Compound Miter Saw
Baseboard and Top Chair Rail
Vertical Slats
Level
Brad Nailer
Brad Nails
Putty (spackle)
Putty Knife
Sanding Sponge
Caulk
Instructions:
Start by determining how high you want your board and batten. I simply cut my 8 foot boards in thirds (minus a little for the saw blade width), so my boards were 31 1/2 inches, plus the 4 inches for top trim. So from the top of the baseboard to the top of my upper chair rail, it was 35 1/2 inches (39 1/2 inches from the floor).
You’ll minus an inch or so for error, and start painting your walls and baseboards (so paint them about 38 inches from the floor). My walls were already painted a “greige” color (Kwal Paints, CL 2882M Berg). So I just painted the bottom half of my wall and my baseboards bright white. I used this semi gloss paint from The Home Depot. I loved the coverage and the sheen of it. It turned out great.

After you’ve painted everything, you’ll cut all of your vertical boards. I set up a jig for my miter saw, just to make sure each of my boards were exactly the same length, then I cut them all at once (31 1/2 inches long).
Let’s talk about what I used for my baseboards, rails, and slats. I used the same, 4 inch wide and 1 inch thick, pre-primed boards for my baseboards and top chair rail. Then I used 2 1/2 inch wide and 3/4 inch thick pre-primed boards for my vertical slats. I found it all at Home Depot in their trim department (not by the casing and baseboards).
You’ll start by nailing your end vertical slat into place. Use a level to make sure it’s straight and level. Once it’s level, use your brad nailer to nail it into place.

After you’ve got your end vertical slat in place, you’ll install the top rail. I had a helper stand at both ends of where the rail would end, and hold a vertical slat up, then place the chair rail on top. I double checked that the chair rail was level, then I nailed it into place (try to nail into the studs if you can). I did NOT nail my vertical slats in yet, only that one edge piece (see above).

You’ll finish installing all of your top chair rail. If you have a corner, like I did, you’ll need to miter the corners. Don’t worry, we’ll putty later. So do the best you can, but don’t stress if it isn’t perfect.
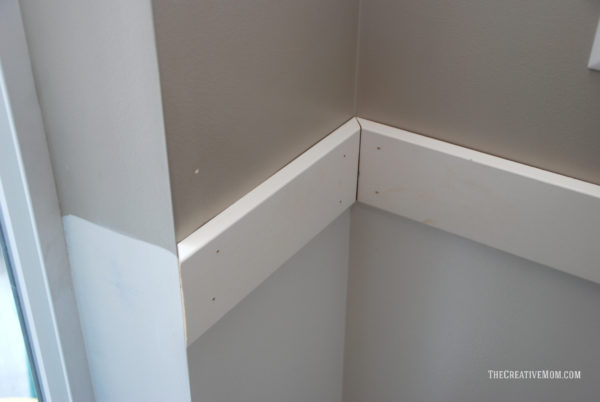
Ok, so now we have all of our top chair rail up and level. The only vertical slat we’ve installed was the one on the very edge of the wall. (on the left of the picture below)
Oh, and at this point you’re going to need to stand back and breath. It’s only going to get messier (and more fun)!

Now we’ll start installing all of our vertical slats. Figure out how far apart you want your slats. I knew I wanted to nail my slats into studs. So, I spaced mine every 16 inches.
A simple way to make sure every slat is the same distance apart is to cut a spacer board so you don’t have to measure each time. Simply place the spacer board against your slat you’ve already installed, then put your next slat up against the other end. Start on the top, and just shoot in one brad nail.

Then slide your spacer board down to the bottom. Make sure everything is straight and level, then nail your slats on. Finish off by securing your board with brad nails. I did a couple at the top, a couple at the bottom, and then 4 or 5 throughout the board. Just remember you have to fill and sand every hole you make. haha.
Oh, and if you don’t have it already, you NEED this Ryobi airstrike Brad Nailer. I have used mine SOO much. I also have the Narrow Crown Stapler. I love these tools because they are truly cordless. You don’t need to lug your air compressor in the house and worry about hoses and cords. Best tools ever. Seriously. It makes all the difference in this type of project.

Ok, so you’re going to repeat the steps above until you have all your vertical slats installed.

Then you’ll fill (spackle) all of your nail holes, and anywhere your chair rails come together.

Let your putty dry over night, and then sand it smooth. (My husband made me this cute sanding block and I appreciated it so much, but I honestly would recommend one of these sanding sponges. SO much nicer.) I’d also recommend using a pretty fine grit, like 200 for sanding.

Once everything is nailed up, filled, and sanded, you’ll caulk where the boards meet the walls. Make sure you use paintable caulk.
After the caulk is dry, you’ll paint everything. I used a cat’s paw roller for pretty much everything on mine and loved it. Except for where the chair rail met the wall, I used an angled brush for that.

It turned out great! I love, love, love it!


If you liked this project, I would love it if you would share it with a friend. You can hover your mouse over the image below and pin it to your pinterest board, or share it on Facebook or Instagram. You can also follow me on Pinterest, Facebook, and Instagram for more ideas like this!

If you liked this project, you might like some of my other DIY projects:
How to frame a bathroom mirror
Farmhouse Storage Coffee Table


Industrial Farmhouse Console Table


DIY Farmhouse Coffee Table (Ikea Hack)


Farmhouse Buffet free building plans

How to install Board & Batten the easy way

Build a farmhouse bench for under $20

DIY Pallet Art (without using a pallet)

I really love this and I have been wanting to attempt it in my house! One thing I’m wondering is- did you replace the baseboards? If so, how did that process go? I haven’t done much diy and I’m nervous to start!
Thanks!
What paint color is in your walls? Ilovethatlight grey!
Thanks so much! The color is BERG from Sherwin Williams!
Beautiful!! What a huge difference it made on the walls. It just pops! Love it!!