DIY Halloween Candy Holder – it lights up!
This DIY Halloween candy holder is seriously SO cool- it lights up! I’m excited to share all the details with you!

We have little kids, so we are always gone trick or treating on Halloween night. I usually leave a bowl of candy on our doorstep, but I wanted to do something a little more fun this year, so I came up with this fun DIY Light Up Halloween Candy Holder.

The best part is that it lights up! Come Halloween night, the trick-or-treaters are in for a fun surprise! I had SO much fun working on it together with my husband. Yes, I said FUN- I had fun working on a project with my husband, and we didn’t even fight. It’s like a Halloween miracle. Haha!

It looks so darling sitting on my porch! I have had it out with treats for a few weeks, and my kids are totally sneaking the candy every time I turn my head- I hope we have some left for the trick-or-treaters on Halloween night. Haha!

Supplies
1/2 sheet (24″ x 48″) of 1/4″ plywood (I like using this MDF)
Paint (grey, blue, black, and white)
Orange String Lights (100 lights)
Scroll Saw
Jig Saw
Brad Nailer & 1 inch Brad Nails
Wood Glue (this is my favorite kind!)
Drill and drill bit
Palm Sander or Sand Paper
Hot Glue gun & glue sticks
Instructions
Ok, so let’s get serious about how to make your own cute Tombstone Halloween candy holder.
Cut out tombstone
Use a jigsaw to cut out tombstone.

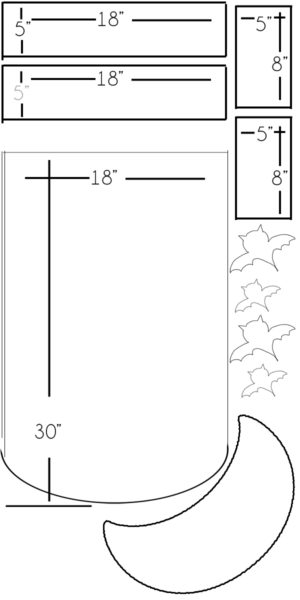
I drew up a rough cut diagram of how we cut all of our pieces from our plywood. But, the curve on the top of the tombstone was cut by tracing around a huge bowl, and the moon and bats were free-handed on my scroll saw, so you will have to be creative on some parts of this project.
Make sure you sand around the edges to give your tombstone a nice smooth finish. This palm sander has lasted me for YEARS. It was the first power tool I ever got, and I love it so much. You can get it from Home Depot or Amazon– it’s a little cheaper on Amazon.

Assemble Candy Box
Using wood glue and a brad nailer, assemble your candy box. You’ll use the 2- 18″ x 5″ pieces as the front and bottom, with the 8″ x 5″ pieces as the side. Notice in the photo below how the side pieces are not flush on the back. This is how your tombstone will keep from tipping over. They act as a kick-stand for the whole thing.

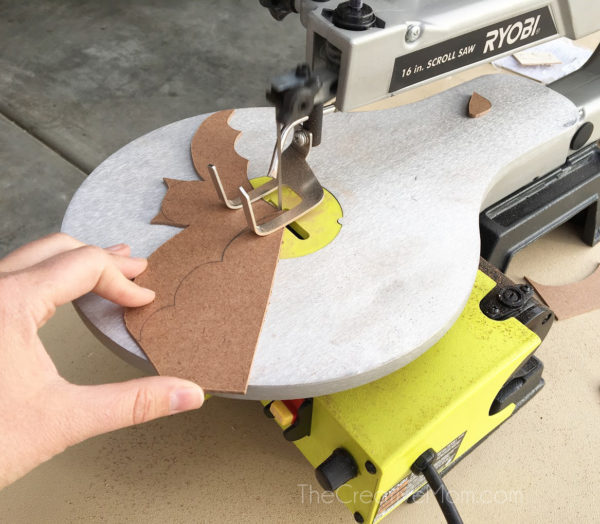
Cut out moon and bats
Use leftover scraps to cut out a moon and bats. You’ll need your moon to know where to drill your holes in your tombstone. This was really fun and quick with my scroll saw.
Drill holes for lights
Set your moon on your tombstone where you want it, then trace around it with a pencil.
Since every strand of lights is different, we drilled some test holes in a scrap piece of plywood to see what size of drill bit fit our lights. Then we drilled around the INSIDE of the moon we traced on our tombstone. We spaced our holes about 1/2 inch apart.

Paint the tombstone
We used a gray spray paint (this is my favorite spray paint ever!) and sprayed the entire tombstone. Then we masked off the treat box and painted it navy blue. You don’t have to use spray paint, or even the colors we did. Use whatever you have.

Then I used a black craft paint and painted little cracks all along the edges of the tombstone.

Next, I traced some letters on the front of my treat box and painted them white. To see the technique of how I traced the letters, see this post for my DIY farmhouse signs.

Add a spacer piece
Using wood glue and short brad nails, attach a scrap 1/2 inch thick board (like a 1×4 or 1/2″ plywood) inside where your moon will be. Just make sure it’s small enough to fit behind the moon. This will allow the lights to shine behind the moon.

Add lights
Insert your lights into the holes and hot glue them in place. Making sure the lights are straight- all pointing in the same direction. We laid our lights out so we made sure we strung them through the holes the right way. We did have some lights left over at the end of the strand, but that worked out because it gave us a longer cord to plug it in.

Here’s a look at the backside after the lights were in place. We added a few strips of tape to hold the loose parts of the lights.

Attach your moon and bats
Use wood glue and short brad nails to attach your moon and bats. You’ll want to glue and nail the moon to the spacer piece that we added earlier, and the bats will be attached to the moon.
All finished

If you liked this project, I would love it if you would share it with a friend. You can hover your mouse over the image below and pin it to your pinterest board, or share it on Facebook or Instagram. You can also follow me on Pinterest, Facebook, and Instagram for more ideas like this!

*The Home Depot partners with bloggers such as me for DIH Workshop program. As part of this program, I received compensation for my time. They did not tell me what to purchase or what to say about any product mentioned in these posts. The Home Depot believes that consumers and bloggers are to form their own opinions and share them in their own words. The Home Depot’s policies align with WOMMA Ethics Code, FTC guidelines and social media engagement recommendations.
More fun Halloween Ideas:


Boys, I gotta boast. I found a hottie online who undressed for me. Just check this out: https://leandromattioli.com.br/questions/index.php?qa=18963&qa_1=short-blonde-big-tits
What’s up,I read your blog named “DIY Halloween Candy Holder – it lights up! – The Creative Mom” daily.Your humoristic style is awesome, keep doing what you’re doing! And you can look our website about free proxy.
I am genuinely grateful to the owner of this web page who has shared
this impressive paragraph at at this time.