
DIY Farmhouse Coffee Table (Ikea Hack)
I’m super excited to show you how to build a farmhouse coffee table, this is an ikea hack!

I love, love, LOVE the farmhouse look. I love using rustic, charming pieces of furniture in my home.
Like my DIY Farmhouse Bench I built for under $20, or my planter box centerpiece.
So when I needed a coffee table in my living room, I knew I wanted it to be a farmhouse style coffee table, and this time I went a different route than building it all myself.

I used the Hemnes coffee table from Ikea and gave it a little facelift. (And it only cost me $10 for the lumber to transform the entire thing!)
I love Ikea’s furniture because it is so simple and sleek (and inexpensive!). I like to use Ikea furniture as the “bones” for my projects.
So I came up with this simple little Ikea Hack to make this DIY Famhouse Coffee Table, which matches my own personal style. And I think it turned out pretty cute!
If you don’t want to go to the expense of buying a new coffee table for this project, just use whatever old coffee table you have- the idea for the project is the same.
Just take a regular coffee table and add planks to the top to give it the rustic farmhouse look.

Supplies:
- Coffee Table (Ikea Hemnes
 Â or Lack)- or whatever old coffee table you have.
 or Lack)- or whatever old coffee table you have. - 9- 1×4’s cut at 48″
- Wood Stain (I used Minwax Dark Walnut)
- Polyurethane (LOVE this wipe on poly)
- Liquid Nails
- 1 1/4″ screws
- Impact Driver
- clamps

Directions:
Step 1: Buy Wood
Start by purchasing your 1×4’s. Measure ahead of time so you know how big you need them. You can cut them at home if you have a saw, or have the Home Depot guy cut them for you (he will be happy to).
I used the Hemnes table, and needed my boards to 48 inches. I was lucky to find my 1×4’s ON SALE in a 4 foot length at my local Home Depot, so I didn’t need to cut them at all.
Make sure when you’re picking out your lumber, you choose the straightest, nicest pieces of wood. You’ll want to make sure they lay flat and aren’t warped at all.
****Please note: Lumber prices vary at different locations, so this may cost more depending on where you live. I was lucky to find my 1×4’s on super sale, so it was inexpensive for me.****

Step 2: Finish Boards
Give your boards a nice coat of stain. I used My FAVORITE stain! I pretty much use it on every project. Then once it was dry, I finished it with THIS Wipe-On Poly.
The Polyurethane simply finishes and protects the wood, making it last longer and stay nicer. And this Poly won’t yellow, which is SO awesome!
(Please note that I didn’t stain the back or ends of my wood- I ended up having to go back and stain them once I was done- not fun! So don’t follow my bad example, and just stain all the sides of the boards in the first place.)
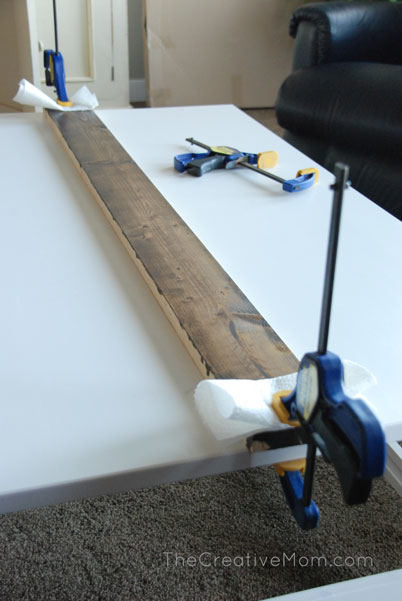
Step 3: Glue Wood onto Table Top
Once your boards are stained and dried, apply some Liquid Nails to the back of your boards, one at a time.
The boards will hang off the edge about 3/4″ on each end, so don’t put the glue all the way on the ends or you’ll have a sticky mess.
(By the way, there are a few different kinds of liquid nails. Make sure you get THIS KIND. And, this price on Amazon is cheaper than I’ve seen it in the hardware stores.)

I marked off the center of my coffee table so I knew where to place my center board.

Step 4: Clamp Boards Down
Place your board in the center of your table and clamp each end down so it won’t move. I used these clamps, but my favorite clamps are the Kreg clamps, which are SO amazing!
Also, this price on Amazon is pretty great, about the same as you’ll find in the hardware stores!
Step 5: Screw Boards Down
Then you’ll use your impact driver to screw a couple of screws on the underside of each end to secure it in place until the glue dries.
The glue is going to be what really holds the boards on, but you’ll want some screws in each end to make sure it stays in place until the glue is nice and dry.
(And yes, I should have stained those edges… whoopsie!)
After you secure your middle board, work outwards- gluing each board, clamping it, and screwing it in place.

The underside isn’t very pretty, but who cares? You’ll just make sure you have screws holding the ends of each board in place.

Step 6: Apply Weight & Let Dry
After all the boards are glued and screwed, turn the entire thing upside down and put something really heavy on the middle part. Then let it sit overnight. This will ensure your boards are flat and stuck down really well, so the top of your table isn’t all warped and uneven.

Step 7: Add extra screws
After it dries overnight, screw a few more screws in the center of each board (on the underside). I ended up having each end screwed, and 3 screws in the center of each board, about every foot or so. This will just help hold the boards in place, so they don’t wobble or warp over time.

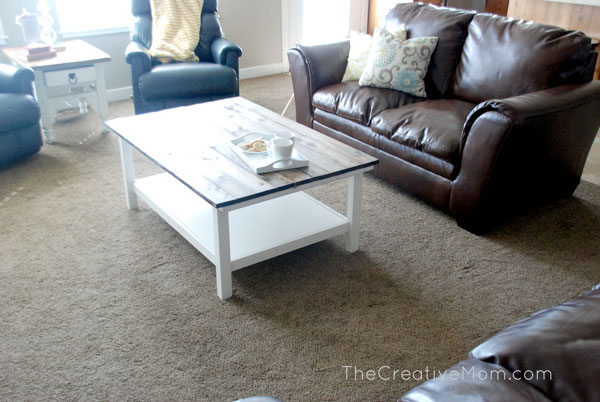
Step 8: Enjoy!
Then, once you turn your table right-side up, you won’t see any glue or screws… just a beautiful, rustic, farmhouse coffee table.

I am in LOVE with how it turned out. It is exactly the style and look I was going for!

And it fits perfectly in my home.
If you used this tutorial in your own home, I would love to see photos and share them here on my blog! Please email completed photos to Nat@thecreativemom.com
I would also love if you would share this project, or save it to your Pinterest board for later! You can hover your mouse over the image above and click the “save†button, or share this on Instagram, Facebook, or Twitter.
If you liked this project, you might like some of my other DIY projects:


This coffee table is so cute! I have been looking everywhere for one like it. We are having our kitchen cabinets refinished next week, but this might have to be the next home project on our list. Love it so much! Thanks for sharing.
wow amazing, this is the great design of the coffee table, Really I love your DIY projects and I will appreciate you for this informative and valuable content. also, I will do small woodworking at the house for entertainment.
Total cost for the build, if you don’t mind me asking? Trying to justify building vs buying
I will appreciate you for this kind of DIY project, Really I love your woodworking and the table designing is so nice and interesting. I will try to make it at home by following your information. Thanks
The perfect super affordable Modern Farmhouse Style Coffee Table that would look amazing. DIY Farmhouse Coffee Table. I love Ikea furniture for the price (so affordable) and the style (love the clean look and simple structure)
I will also try this hack on my table.
I loved that design!
Can you please tell me what types of saws are used to make this table!
TIA
Regards
James V. Jordan
OK, folks. Get off Natalie’s case. She picked up lumber at a bargain price on sale. If your store does not have them on sale, you pay regular price, DUH!
Read my post on bargain lumber – and FREE. I buy lumber from sawmills AT 20%-40% OFF RETAIL. Stack and sticker in the dry for a year. Look at all the money I save buying from local sawmills. I have about 1,000 to 1,500 board feet various species at various stages of drying. So, when I say I buy Red Cedar (3/4″x24″ 4″ to 6″ wide) all neatly packed into 200 boards for $30,. It’s true. Just have to shop around. Google SAWMILLS in your ares. Unless you live in a desert, they are around.
Hi Natalie – Just a FYI – You mentioned getting 1x4s on sale at HD. I happened by a local Lowes last year. Someone had returned 400 treated fence pickets. I asked about them and what price to buy them all. Manager said 50-cents each. I loaded all I could get in my suv, unloaded and went back with my trailer and got them all. I use them for lots of things.
FREE lumber at Lowe’s- lumber, drywall and plywood come banded. They use pine of several sizes to keep the bands from damaging the product. Those are at the back door. They are free. Couple of weeks ago the free stuff included 1/2 peg board panel and 7- 1×3 pine lumber with defects.
Marvin’s Tiny Wood Shops.
Fayetteville, Arkansas
GREAT JOB! I too am a do-it-yourselfer … I enjoy coming up with ideas then seeing it once it is made … I also make my own preserves of food to enjoy throughout the winter … it makes a nice welcomed change to have something “different” in the home on those winter days that sometimes seems so dreary outside and you’re stuck inside … it’s so nice to be retired and single again to enjoy what you love which also includes crocheting – they make great gifts to give away all throughout the year.
I think the table looks AMAZING and I am so excited to try it with mine. I am sorry that so many people wrote negative comments (mostly about price) when you gave such good directions and details about how to do it. Looking forward to “creating” my own “new” coffee table this weekend!
Did you sand your boards before staining? I just bought all the stuff I need, but didn’t get sand paper because I didn’t see it on your list.
This project is underway for me! Since I am not a regular DIYer, I did not really have any materials to begin with. My Home Depot sold 1″x4″x4′ planks for $1.95 each (7), sanding block $5, stain $8, Wipe On Poly for $12, wiping cloths $3, Liquid Nails $4. Total cost of base materials was $46. However, I also ended up getting spray paint for my table, a plastic drip tarp, disposable latex gloves, and a finer sanding block for multiple poly coats. All in all, it was more than $10, but much less expensive than a nice coffee table. And, now I have stain, poly, glue (and experience) for any future projects. Wonderful guide for a first time project! So happy I did this. 🙂
Although, if I had to do it again, I would also invest in some wood conditioner as my planks absorbed the stain a little unevenly.
Thanks so much for this idea! I used the IKEA lack table and it turned out fabulous!! I absolutely LOVE my new table 🙂 I looked all over for coffee tables and couldn’t find ones I liked for under $300. This cost me well under $100 and is exactly what I wanted! Thanks again 🙂
It was not $10, I went to home depot and purchased all the items exactly what you have on here plus the clamps, it is no were near that amount. I could have just bought another table.
Not sure where you live but Im in Texas and my sister is in Missouri I was trying to o a project she did She told me to go to Lowes or Home Depot to buy the wood. Her cost wasw $5.96 The cost for the SAME piece of wood in Texas was $12.96 So my project would have gone up $7 more for each piece of wood I needed Maybe something similar happened here? Just a heads up because I was shocked in the price difference for the same wood at the same stores in different States!
I have to agree with some of the comments above. My boyfriend and I went to buy the supplies at Home Depot the other day and our total for the exact supplies was $75. Definitely not $10. So that was a bummer and really misleading. We definitely could have bought a new table for that price. End result is nice, and the project itself isn’t too complicated just wish the actual price was listed before we got super excited to find out the price was way off
You didn’t have to buy the items and how was it misleading ? Did your store not advertise the prices prior to you buying ? The blogger paid what she paid not her prob your store sold for different amounts. Seriously ???
It is actually misleading. The title of the article says you can make it for less than $10, but when you read the post in detail, she says less than $10 for the wood. Super misleading!
Her article says “****Please note: Lumber prices vary at different locations, so this may cost more depending on where you live. I was lucky to find my 1×4’s on super sale, so it was inexpensive for me.****”. If you can’t price out your materials on your own, that’s no ones problem but yours and you probably shouldn’t be using power tools if you need your hand held that much. Bottom line is that she is sharing an awesome idea she had, no one forced you to purchase the materials, if you can’t afford it put it back, simple. Get over it.
Extremely misleading that the title of the article says do this for less than $10, but when you read it in detail, it says $10 for the wood ALONE! Also, she says to wait for the stain to dry which is not accurate either. The directions on the container say to let it sit for 20 minutes and then wipe off the rest. I’m still working on mine, and it looks beautiful so far, but I’m upset that this is now a $75 table.
You didn’t have to buy anything once you realized how much it was. Sorry, not sorry. buh bye
That table would have cost you at least 250-300 new!!! 75 bucks is an AWESOME price!!! But no one forced you to buy it…simple, you could have just said oh well, this is gonna cost 75 bucks and walked out, this girl was fortunate enough to find it on sale…plain and simple, she said “prices may vary” it’s YOUR CHOICE…TO BUY OR NOT TO BUY!!!
If only wood is that cheap over here…
Did you send the boards at all??
Question: I bought the lack table Instead of the hemmes, will the boards be the same dimensions as the ones you used for the hemmes table?
Measure it!!! Duh
The “Lack” table from IKEA is actually about 1.5 inches shorter. Remember: measure twice, cut once. Good luck on your project!
Where in the world did you find those boards for 99 cents!?!? We only have 1x4x6 and longer, and they start at around $7!
I think my Home Depot must have been having a promotion or a special on these boards, because I haven’t been able to find them since that day I did this project. Super bummer!
The picture of the lumber you included on the post says it’s a “promo”. Looks like you got lucky the day you shopped!
Most LOWE’S have just what you need!
I just bought some today and my Lowes had them for 1.65. I asked if they cheaper ones than the 5 dollar boards and they showed me the others
you should really stain or paint both sides of the boards to prevent warping.
This is EXACTLY what I was looking for! I’m new to furniture DIY and I have this insanely ugly drafting table similar to ikea type furniture after a ton of moving and overshooting the cutting mat with my razor blades. This is the easiest idea I found on Pinterest! Perfect!
Just finished making a version of this an Ikea Lack side table. From mediocre to fabulous in just a few days! Thanks.
Hi Cathy, I just bought the lack table. Did you use the same size boards as mentioned In this DIY blog? I know she used 1×4 4″ but she also did it on the hemmes ikea table and not the lack. Any help would be so much appreciated 🙂
Yes ^^^ I need help with that!
I bought the Lack table and used 1×4’s and they’re length was 46.5′. If you measure your table you should be able to figure it out.
Girl I am in love with this table and I love even more that you made this look SO easy to make!!! I now want one really bad – great job girl! Loved watching you!
First you must have a coffee table at home or this project would end up over hundreds. This ikea coffee table sell for around $240 before tax at IKEA.