
Ikea Hack- DIY Farmhouse Coffee Table

I love Ikea furniture for the price (so affordable) and the style (love the clean look and simple structure), but my home has more of a Farmhouse look. So I knew I wanted a coffee table that matched my DIY Farmhouse Bench I built for under $20, my jumbo picture frame, and my planter box centerpiece. Normally I would just build something myself, but I love the idea of transforming an existing piece of furniture to fit your style. I used the Hemnes coffee table from Ikea and gave it a little facelift. (And it only cost me $10 for the lumber to transform the entire thing!)

Supplies:
Coffee Table (Ikea Hemnes![]() or Lack
or Lack![]() )
)
9- 1×4’s cut at 48″
Wood Stain and Polyurethane
Liquid Nails![]()
1 1/4″ screws
Impact Driver
Clamps

Instructions:
Start by getting your 1×4’s. Measure ahead of time so you know how big you need them. You can cut them at home if you have a saw, or have the Home Depot guy cut them for you (he will be happy to). I used the Hemnes table, and needed my boards to 48 inches. I was lucky to find my 1×4’s in a 4 foot length at my local Home Depot, so I didn’t need to cut them at all. Make sure when you’re picking out your lumber, you choose the straightest, nicest pieces of wood. You’ll want to make sure they lay flat and aren’t warped at all.

Give your boards a nice coat of stain. I used Minwax Dark Walnut stain, then once it was dry, I finished it with Minwax Wipe-On Poly![]() . The Polyurethane simply finishes and protects the wood, making it last longer and stay nicer. (Please note that I didn’t stain the back or ends of my wood- I ended up having to go back and stain them once I was done- not fun! So don’t follow my bad example, and just stain the entire thing in the first place.)
. The Polyurethane simply finishes and protects the wood, making it last longer and stay nicer. (Please note that I didn’t stain the back or ends of my wood- I ended up having to go back and stain them once I was done- not fun! So don’t follow my bad example, and just stain the entire thing in the first place.)
Once your boards are stained and dried, apply some Liquid Nails![]() to the back of your boards, one at a time. The boards will hang off the edge about 3/4″ on each end, so don’t put the glue all the way on the ends or you’ll have a sticky mess. (By the way, there are a few different kinds of liquid nails. Make sure you get THIS KIND
to the back of your boards, one at a time. The boards will hang off the edge about 3/4″ on each end, so don’t put the glue all the way on the ends or you’ll have a sticky mess. (By the way, there are a few different kinds of liquid nails. Make sure you get THIS KIND![]() . And, this price on Amazon is cheaper as I’ve seen it in the hardware stores.)
. And, this price on Amazon is cheaper as I’ve seen it in the hardware stores.)

I marked off the center of my coffee table so I knew where to place my center board.

Place your board in the center of your table and clamp each end down so it won’t move.
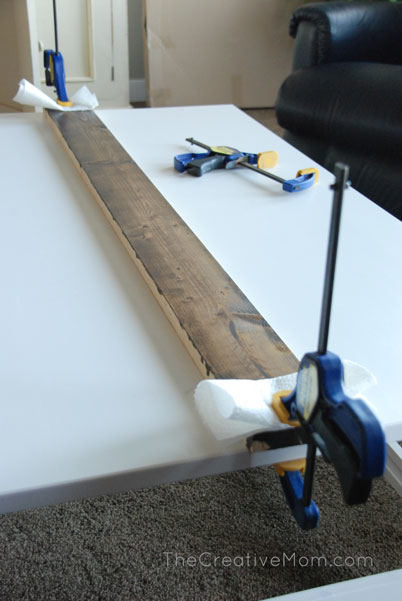
Then you’ll use your impact driver![]() (if you don’t have one, I highly recommend this Ryobi Cordless Impact Driver) to screw a couple of screws on the underside of each end to secure it in place until the glue dries. The glue is going to be what really holds the boards on, but you’ll want some screws in each end to make sure it stays in place until the glue is nice and dry. (And yes, I should have stained those edges… whoopsie!) After you do your middle board, then work outwards- gluing each board, clamping it, and screwing it in place.
(if you don’t have one, I highly recommend this Ryobi Cordless Impact Driver) to screw a couple of screws on the underside of each end to secure it in place until the glue dries. The glue is going to be what really holds the boards on, but you’ll want some screws in each end to make sure it stays in place until the glue is nice and dry. (And yes, I should have stained those edges… whoopsie!) After you do your middle board, then work outwards- gluing each board, clamping it, and screwing it in place.
Let me just talk for a minute about why I love impact drivers rather than regular drills. Impact drivers use IMPACT to drive the screws (hence the name). It’s really important in this case, because we are drilling from the underside, and we really want the board to be sucked in by the screw and lay flush and tight against the table. This Ryobi Impact Driver![]() is the one I use, and I love it.
is the one I use, and I love it.

The underside isn’t very pretty, but who cares? You’ll just make sure you have screws holding the ends of each board in place.

After all the boards are glued and screwed, turn the entire thing upside down and put something really heavy on the middle part. Then let it sit overnight. This will ensure your boards are flat and stuck down really well, so the top of your table isn’t all warped and uneven.

After it dries overnight, screw a few more screws in the center of each board (on the underside). I ended up having each end screwed, and 3 screws in the center of each board, about every foot or so. This will just help hold the boards in place, so they don’t wobble or warp over time.

Then, once you turn your table right-side up, you won’t see any glue or screws… just a beautiful, rustic, farmhouse coffee table.

I am in LOVE with how it turned out. It is exactly the style and look I was going for!

And it fits perfectly in my home.
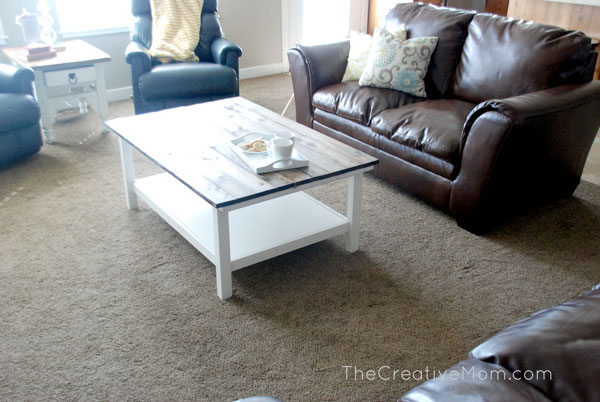
Plus, the kids love having a new racetrack to play on. Because I used pine (a softer wood), it won’t stand up to scuffs and scratches as well as a harder wood. But I don’t mind if it gets used and beat up a little bit, because it just adds to the character and rustic feel I was going for.
Before I go, I want to share this totally off subject tip. If you have a son, they NEED (yes, I said need) a truck and trailer combo. Seriously, best toy for boys of all time. My kids (even my girl) really love this Monster Truck and Trailer Set![]() .
.

If you liked this project, I would love it if you would share it with a friend. You can hover your mouse over the image below and pin it to your pinterest board, or share it on Facebook or Instagram. You can also follow me on Pinterest, Facebook, and Instagram for more ideas like this!
If you liked this project, you might like some of my other DIY projects:
How to frame a bathroom mirror
Farmhouse Storage Coffee Table


Industrial Farmhouse Console Table


DIY Farmhouse Coffee Table (Ikea Hack)


Farmhouse Buffet free building plans

How to install Board & Batten the easy way

Build a farmhouse bench for under $20

DIY Pallet Art (without using a pallet)

I love this idea! Here’s another idea that is similar for making a coffee and end table set!
https://www.ordinaryroyalty.com/2018/04/the-easiest-coffee-and-end-table-set.html
I have this same table from Ikea and the kids have beaten the top of it pretty bad. I was thinking it would be great to put wood slats on top and I was sure someone has done it and could show me how…and then I saw it on your blog! I can’t wait to show this to my husband! Thanks for the tutorial!