
How to Sew a Table Runner

A few weeks ago, I shared this project on The Ribbon Retreat as part of their A-Z Crafting Series. And I’m excited to share it with you guys today!
My letter for the A-Z Crafting Series was “T”!! So I created this SIMPLE tutorial for how to sew a table runner.
When I say this project is simple, I mean it! You could easily finish this project in one naptime, unless your child is boycotting naps, like mine… in that case, let the kids run free and wreak havok for an hour while you whip this baby up! I promise you’ll have it done in no time!

This table runner will really add a lot of personality to a space, especially if you add two of my favorite things to each end like I did: ric rac and pom pom trim. These trims are drool-worthy, guys. They add so much personality and totally finish off the project.

I love the way my table runner turned out. It looks super cute on my dining room table, under my Planter Box Centerpiece.

It was so easy to sew, I actually made a mini version for my side table, and I love it just as much as my full-sized kitchen table runner, maybe even more… cause miniature things are always so cute!

Here’s how to sew a table runner.
Please note, these instructions will make a finished table runner about 14 inches wide by 7 feet long. However, with the supply list, you have enough fabric to make THREE 7 foot table runners. If you are planning on making 3, make sure you have enough stabilizer, ric rac, and trim for each table runner. Also, make sure to measure your table first, and adjust the dimensions to fit your space.
Supplies:
2.5 yards of fabric (mine is by Moda “Big Dots“)
2.5 yards iron-on stabilizer (interfacing)
2 yards ric rac
1 yard pom pom trim.
Scissors, pins, measuring tape, sewing machine, thread
Instructions:
Start by cutting your fabric. You will cut your fabric in thirds length wise. If your fabric is 45 wide, like most fabrics, you will end up with 3 pieces of fabric, about 15 inches wide, by 2.5 yards.

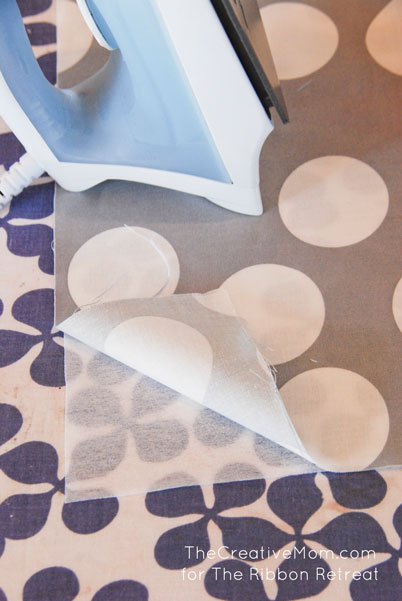
Cut a piece of stabilizer the same size. (make sure your stabilizer or interfacing is iron-on.)

Then iron the backside of your fabric to the stabilizer or interfacing, following the instructions on the package.
Now it’s time to finish the edges. Just fold the edges over 1/4 of an inch. Then fold them over again. This will give you a nice, finished edge.

As my mother always says, iron and pin along the way, it’ll save you a lot of trouble unpicking seams!

Then sew a straight stitch to finish the edges.

You could stop here and have a finished table runner… also, it would be a boring table runner. So go the extra mile and add some pom pom trim and some ric rac. It’ll make everything in your life a little more fun!

Just top stitch a 17 inch long length of pom pom trim on the end of your runner, folding the edges of the trim over to the back. Then scoot over a few inches and do the same with your ric rac. My rows of ric rac are about 3 and 4 inches from the edge.

I sewed my pom pom trim and my ric rac on one end (I just eyeballed where I wanted it to go). Then I folded my table runner in half, and pinned my ric rac in place so it matched the other end.

And that’s it! You’ve got yourself a finished table runner! It wasn’t that hard, now, was it?

Please make sure to check out my other projects I’ve made for the Ribbon Retreat:
Soft and Cuddly Minky Blankets
And visit me on my blog, where I am always inspiring you to do it yourself.